You have a design. You email three factories for a price. Two never reply, and the one that does quotes a number that feels random.

Here is what is happening on the other side of that email.

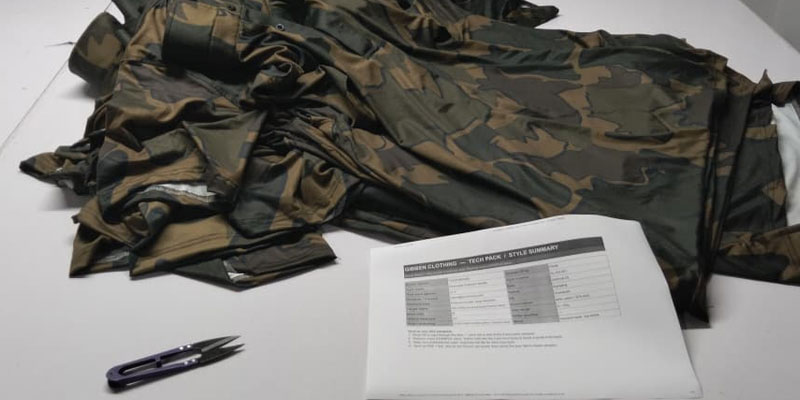
Without a tech pack, the factory cannot see your garment clearly enough to cost it.

So they do one of three things:

  1. They pass on the order.
  2. They pad the quote to cover the back-and-forth they know is coming.
  3. They make assumptions you never approved and surprise you at the first sample. None of those help you.

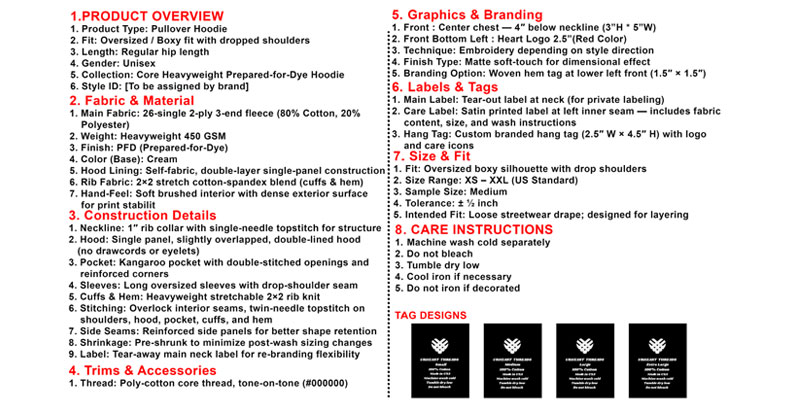
A tech pack fixes all three. It is the technical package: the complete set of specifications for a single garment. Flats, materials, measurements, tolerances, construction, trims, colorways, and labels in one document.

Think of it as the blueprint and the contract at the same time. Done right, the factory can quote accurately, sample closely, and produce consistently, without guessing on your behalf.

This guide is written from the factory floor.

It covers what a tech pack is, the eight sections every one needs, how to spec fabric so it does not get substituted, how to build a measurement chart and grade it across sizes, and the mistakes that quietly cost you a sample round.

At the end, there is a complete checklist and a free template you can fill in today.

01: What a tech pack is and why no factory quotes without one

The short version: it is the shared language between your idea and the factory’s machines.

A tech pack, short for “technical package,” sometimes called a “spec pack” or “garment worksheet,” is a document that tells everyone who touches your product exactly how to build it.

Every measurement, material, construction method, color, and finishing detail in one place. It is what a designer hands a manufacturer so a sketch can become a real garment.

A sketch communicates an idea. A tech pack communicates instructions.

That difference is the whole reason it exists. The factory does not need to be inspired by your vision; it needs to know the chest width at size M, the fabric weight in GSM, and whether the cuff is ribbed or hemmed.

The tech pack is where those answers live.

Upload Image...

A tech pack lives on the production floor, not just in a folder. It is checked at cutting, sewing, and final inspection.

Why a factory cannot quote accurately without one

A price quote is a sum of known costs: fabric consumption, trims, labor minutes, finishing, and packing.

Each of those depends on details only a tech pack supplies.

How much fabric does the garment eat?

That needs measurements and a fabric weight.

How many labor minutes?

That needs the construction and stitch types.

Which trims?

That needs a bill of materials.

Take any of those away, and the factory is estimating. A careful factory will quote high to protect itself against the revisions it expects.

A less careful one will quote low, then issue a change order once reality lands. Either way, the number you got was never really for your garment.

Why this matters more on small runs

On a 5,000-piece order, one wasted sample round is a rounding error. On a 100-piece streetwear drop, it can eat the entire margin. The smaller your run, the more a tight tech pack protects you because there is no volume to absorb a mistake.

Who actually reads your tech pack

It helps to picture the people on the other end, because the tech pack is written for all of them at once. It is not one reader; it is a relay.

  • The pattern maker reads your flats and measurements to cut the first pattern.
  • The sample room reads your construction notes to sew the prototype.
  • The cutting floor reads the fabric spec and consumption.
  • The sewing line reads the stitch and seam callouts.
  • The quality inspector reads the measurement chart and tolerances to pass or fail the run.
  • The sourcing team reads the BOM to buy materials. And on an export order, customs reads your labels.

Each of them needs different information, and none of them were in the room when you designed the garment.

That is why “the factory will figure it out” is risky advice: there is no single factory mind, just a chain of specialists who each act on the page in front of them.

A complete tech pack is what keeps that chain aligned across languages, time zones, and shifts.

Tech pack vs. spec sheet

These two terms get used interchangeably, but they are not the same thing.

1. A spec sheet is mostly the measurement chart, the points of measure, and their values.

2. A tech pack is the full package: the spec sheet plus flats, BOM, construction, trims, colorways, grading, and labels.

The practical rule: if the product is simple and the factory already knows your standards, a spec sheet can be enough. If the design is complex, the run is large, or the factory is new to you, a full tech pack is non-negotiable. For a new streetwear label approaching a manufacturer for the first time, assume you need the full pack.

02 The 8 sections every tech pack needs

Skip one, and you have created a question. Questions become sample rounds.

A complete tech pack is not one page. It is a set of pages, each doing one job. Here are the eight that matter most for cut-and-sew streetwear. The order below is also the order they should appear in the document.

01

Flats & callouts

Black-and-white technical drawings from every view, with numbered notes.

02

Bill of materials

Every component the factory must source, from fabric to hangtag.

03

Measurement spec

Every point of measurement is graded across the size range.

04

Tolerances

The agreed pass/fail band for each measurement.

05

Construction

Seam types, machines, stitch types, and stitches per inch.

06

Trims & hardware

Drawcords, eyelets, zippers anything that is not fabric or thread.

07

Colorways

Each color combination, with Pantone references.

08

Labels & packaging

Fibre content, care, origin, and how it ships.

01 · Flats and callouts

Flats are clean, black-and-white line drawings of the garment, drawn flat as if it were laid on a table.

Front, back, and any view that hides detail for a hoodie; that usually means an interior or hood view too.

They are not styled illustrations. They are blueprints. The convention is simple: a solid line is a seam, a dashed line is stitching.

Callouts are the numbered notes that point at specific parts of the flat.

Callout 02 points at the kangaroo pocket and says, “Double top-stitched, bar-tacked at openings.” Each callout removes one decision the factory would otherwise make for you.

The more honest your callouts, the fewer surprises in the sample.

Upload Image...

A flat with numbered callouts. Solid lines are seams; dashed lines are stitches.

02 · Bill of materials (BOM)

The BOM is the shopping list. Every component the factory has to source or supply, line by line: body fabric, rib, hood lining, drawcord, eyelets, sewing thread, main label, care label, hangtag. For each one, you name the material, the composition, the weight or size, and the color.

This is the section that most directly drives your quote.

A missing BOM line is a cost the factory either misses or pads for. Leave the drawcord off, and you will either get the cheapest cord in the building or a follow-up email that delays everything. Completeness here is what makes competing quotes comparable.

03 · Measurement spec (points of measure)

This is the section that defines fit. It lists every point of measure, body length, chest width, sleeve length, cuff width, hood height, and so on, against a base size, then grades those values across the full size range. Measurements are how your sample is judged: the factory measures the sample flat and checks it against this chart. We build a full example in section 4.

04 · Tolerances

No two garments come off the line identically. A tolerance is the band of variation you agree to accept on each measurement, for example, plus or minus 1 cm on body length or plus or minus 0.5 cm on shoulder. Inside the band, the garment passes. Outside it, the garment fails and gets remade.

Tolerances are not a detail to leave for later. They are the line between “this is fine” and “this is wrong,” and if you do not set them, the factory sets them for you. Tight tolerances on the measurements that define your silhouette; looser ones where a few millimeters do not change anything.

QUICK RULE

Tighten tolerances on the measurements buyers feel: chest, length, and shoulder. Loosen them on measurements nobody notices: pocket position or label height. Tolerancing everything tightly just raises your reject rate and your price.

05 · Construction and stitch details

This is where a lot of the value of a tech pack lives.

It explains how the garment is assembled: which seam joins the shoulder, which machine sews it, what stitch type is used, and how many stitches per inch.

A drop-shoulder hoodie might call for a 4-thread overlock on the side seams and a coverstitch on the cuffs and hem.

You do not need to be an industrial engineer to write this.

You need to be specific about the things that affect look and durability: where seams are taped, where bar tacks reinforce stress points, and how the hood is lined.

The factory fills in the rest with its own machines, and a good one will suggest improvements.

06 · Trims and hardware

Trims are everything that is not the main fabric or the thread: drawcords, eyelets, cord stoppers, zippers, rivets, and woven labels.

For each, specify the finish, the size, and where it goes. A “metal eyelet” is three different parts depending on whether you mean brass, gunmetal, or nickel, and 5 mm versus 8 mm changes the whole look of a hood.

Hardware is also where cheap substitutions hide. If you do not name the zipper brand and the eyelet finish, the factory will quote and ship whatever is in stock.

Naming them protects both the price and the product.

07 · Colorways

A colorway is one complete color combination of the garment: body, rib, print, and drawcord together.

Each color in each colorway needs a Pantone reference quoted in a single system. TCX for cotton is the streetwear standard. “Black” on its own gets you three different blacks across three dye lots. A Pantone number gets you the same black every time.

Upload Image...

Each colorway pairs body, rib, and print colors with their Pantone references.

08 · Labels and packaging

This section is part presentation and part law. In most markets, a garment must carry fiber content, care instructions, and country of origin. In the US, that includes the rules enforced by the Federal Trade Commission on textile and care labeling; other markets have their own. Get this wrong and your shipment can be held at customs.

Packaging covers the rest: main label placement, hangtag, polybag with its suffocation warning, folding, and carton packout. None of it is glamorous, and all of it gets quoted, so it belongs in the pack.

03 How to spec fabric correctly

Three numbers decide whether your fabric arrives the way you imagined it: weight, composition, and finish.

Fabric is the single biggest driver of how a garment feels and what it costs. It is also the easiest thing to get substituted if you are vague. “Heavyweight cotton hoodie” is not a spec; it is a wish. Here is how to turn it into something a factory can source and a mill can match.

Weight (GSM)

Fabric weight is measured in GSM (grams per square meter. Higher GSM means a denser, heavier, usually warmer fabric. For hoodies and fleece, it is the number that separates a flimsy blank from a premium one, so it is worth getting right. The ranges below are the ones the industry works to.


Weight class Typical GSM How it reads Best for
Lightweight 200–280 Thin, breathable, packable Summer, layering, active wear
Midweight 280–350 Substantial but not bulky Everyday hoodies, all-season
Heavyweight 350–400+ Thick, structured, warm Premium & oversized streetwear

Industry ranges compiled from apparel manufacturer guides; confirm exact figures against your own mill’s specs.

For context, French terry, the classic hoodie knit, usually sits in the midweight band, while brushed fleece runs heavier. Premium “heavyweight” streetwear typically starts at 400 GSM and climbs from there; some collector pieces push well beyond 500.

But GSM is not a quality score on its own. A 300 GSM cotton hoodie and a 300 GSM polyester one weigh the same and feel completely different, which is why weight always travels with composition.

SPEC IT LIKE THIS

Not “heavyweight fleece.” Instead: 400 GSM brushed-back French terry, 80% cotton / 20% polyester, garment-washed for low shrinkage. That is a sentence a mill can quote against and a lab can test.

Knit types for streetwear

Weight and composition tell the mill how heavy and what fiber. The knit construction tells it how the fabric is built, and for hoodies and sweats, that is where a lot of the character lives. Two fabrics at the same GSM and composition can feel like different products if one is French terry and the other is fleece.

  • French terry looped on the inside, smooth on the face. The streetwear default. Breathable, structured, and takes print well. Usually midweight, but heavyweight French terry is the backbone of premium drops.
  • Brushed-back fleece: The inside loops are brushed into a soft, warm nap. Heavier and cozier than terry at the same weight. The classic cold-weather hoodie hand-feel.
  • Loopback: a looser, more open loop on the reverse. Lighter and more casual; a softer drape than tight French terry.
  • Jersey: a thin single knit, no loops. For lightweight hoodies, layering pieces, and tees rather than substantial sweats.

Name the knit alongside the weight and composition, and your three-number fabric spec becomes a four-part one the mill cannot misread. “400 GSM brushed-back French terry, 80/20 cotton-poly, garment-washed” leaves almost nothing to interpretation.

Composition

Composition is the fiber breakdown, written as percentages: 100% cotton, 80% cotton / 20% polyester, 95% cotton / 5% elastane.

It changes everything downstream: softness, shrinkage, how the fabric takes a print, and how it ages. Cotton breathes and feels natural but shrinks and creases more. Polyester adds durability and shape retention but feels different against the skin. A touch of elastane in the rib keeps cuffs and hems snapping back.

Always state the composition for the body and the rib separately. They are usually different knits, and a mismatch in shrinkage between body and rib is a common reason cuffs pucker after the first wash.

Finish

Finish is what happens to the fabric after it is knitted: brushing, garment washing, enzyme washing, peaching, and anti-pill treatment. Each one changes the hand-feel and the final measurements. A garment wash, for example, softens the fabric and pre-shrinks it, but it also moves your measurements, so the factory needs to know it is coming when they cut the pattern.

If you skip finishing, you are leaving the texture of your product to chance. Name it, and reference a physical swatch wherever you can. A swatch is the clearest spec there is.

If you are still deciding which weight and knit suit your drop, our hoodie GSM and fabric weight guide walks you through the trade-offs in detail, and the fiber composition guide covers how blends behave in production.

04 Measurement charts and grading basics

Where fit becomes a number the factory can hit and check.

The measurement spec is the part of the tech pack that controls fit.

It works on a simple idea: pick a base size, measure every point on that size, then grow and shrink those numbers in regular steps to create the other sizes. That stepping is called grading.

Points of measure (POM)

A point of measure is a single, named, repeatable measurement. “Chest width, measured flat 2.5 cm below the armhole.” “Body length from the high point of the shoulder to the hem.” The naming and the how-to-measure note matter as much as the number, because a measurement nobody can repeat is not a spec; it is an argument waiting to happen.

Here is a worked example for an oversized pullover hoodie in centimeters, with size M as the base. Treat the numbers as a starting point to replace with your own graded pattern.

Point of measurement  Tol ± S     M     L      XL    XXL   Grade
Body length (HPS to hem) 1.0 70 72 74 76 78 2.0
Chest width (2.5 cm below armhole) 1.0 60 63 66 69 72 3.0
Bottom hem width 1.0 56 59 62 65 68 3.0
Shoulder width 0.5 56 58 60 62 64 2.0
Sleeve length (from CB) 1.0 82 84 86 88 90 2.0
Cuff width (relaxed) 0.5 9.0 9.5 10 10.5 11 0.5
Hood height 0.5 36 37 38 39 40 1.0

Example: only a partial spec for an oversized pullover hoodie. A full pack lists every POM, including neck width, armhole, pocket dimensions, and rib heights.

How grading works

Grading is the rule that creates each size from the base. In the table above, body length grows 2 cm per size and chest width grows 3 cm per size. Those increments are the grade rules. They do not have to be identical for every measurement; a sleeve might grade 2 cm, while a cuff grades only 0.5 cm, but within one measurement, the step is usually constant from size to size.

You do not have to invent grade rules from nothing.

A pattern maker grades from your approved base pattern, and the factory’s pattern team can advise on standard increments for your category.

What you must do is decide the base size fit first. Grading a base pattern that fits wrong just produces a whole size run that fits wrong.

ORDER OF OPERATIONS

Perfect the base size on a real fit sample. Then grade. Then write the chart. Grading before the base fit is confirmed is the most common way a brand ends up with five sizes of the same mistake.

Units and consistency

Pick one unit and stay in it across the whole pack. Most international factories, including ours in Sialkot, work in centimeters; many US buyers spec in inches. Either is fine; mixing them is not. Put the unit in the chart header so there is no ambiguity, and keep the “how to measure” notes attached to the chart, not buried elsewhere.

If you run quality checks on incoming production, this same chart is what your inspector measures against. Our guide to AQL inspection and quality control covers how those measurements feed a pass/fail decision on a finished run.

05 Streetwear-specific: prints, embroidery & oversized fits

A streetwear tech pack carries a few things a generic apparel one often skips.

The eight sections cover any cut-and-sew garment. But streetwear leans hard on three things: graphics, branding, and silhouette, and each needs its own spec or it becomes the part of the sample that comes back wrong.

Screen prints

A print is not just artwork dropped on a chest.

The factory needs the placement (measured from the high point of the shoulder, not “centered”); the print dimensions; the technique (plastisol, water-based, puff, or discharge); the ink colors as Pantone references; and the artwork itself as a vector file.

A print measured “12 cm below HPS, 28 cm wide, water-based, Pantone 16-1546” lands where you meant it to. “Big logo, centered” does not.

Technique matters as much as placement. Water-based ink sinks into the fabric for a soft, vintage hand; plastisol sits on top, bright and durable; puff and discharge change the texture entirely.

Each prints differently on different fabrics, which is one more reason the fabric spec and the print spec have to travel together.

Embroidery

Embroidery needs a digitized file, not just a logo image.

The stitch file is what the machine reads. Specify the placement, the size, the thread colors, the stitch type (flat, 3D puff), and the backing. On a heavyweight knit, also note the stabilizer, because dense embroidery on stretchy fabric puckers without it. A swatch test on the actual body fabric is the safest way to approve it.

Upload Image...

Print and embroidery each need their own spec page technique, placement, colors, and a test on the real fabric.

Oversized and dropped-shoulder fits

The oversized silhouette is central to modern streetwear, and it is easy to get wrong on paper.

A dropped shoulder is not just a wider shoulder measurement; it changes the armhole, the sleeve length, and how the whole garment hangs. Specify the shoulder width, the armhole depth, and the body width together, and reference a fit you have approved, because “oversized” means five different things to five different pattern makers.

This is exactly where tolerances earn their place. On an oversized fit, body width and length are the measurements buyers feel, so tighten the band there and let smaller details run looser. If you are weighing the silhouette itself, our guides on zip-up vs. pullover and hoodie styles and cuts break down how construction choices change the final shape.

06 How to assemble and send your tech pack

A complete pack sent badly still causes delays. Here is the order that works.

Building a tech pack is not linear, but sending one should be.

Work through the sections in the order they appear in this guide because each one feeds the next: the flats inform the construction, the fabric informs the measurements, and the measurements inform the tolerances.

Trying to write tolerances before you have a fit sample, or colorways before you have chosen fabric, just creates rework.

Build it in this order

Start with the style summary and flats; they frame everything. Add the BOM and fabric spec next, since those drive sourcing and cost.

Then build the measurement spec from your approved base fit and grade it. Layer in construction, trims, and colorways.

Finish with labels and packaging. Keep a revision log open from the first version so every change is tracked.

Send the right files

Export the finished pack as a PDF for reading, and keep the editable spreadsheet for the parts that change during fittings, the measurement spec especially.

A spreadsheet is far easier to update than a locked PDF, and the fit process always produces edits. Send both, named clearly with the style number and version.

A CLEAN FIRST EMAIL TO A FACTORY

One paragraph: who you are, what you are making, the order quantity, and your target date. Attach the PDF and the spreadsheet. Ask for a quote and a sample lead time. That is, a factory can act on that immediately, and a complete pack does the rest of the talking.

Expect the pack to keep moving

Your tech pack is not finished when you send it; it is finished when the garment ships.

The factory may come back with notes on a trim that is easier to source a different way or a construction tweak that improves durability.

Those go into the pack, the version number ticks up, and the revision log records why. A tech pack that updates cleanly is the sign of a project under control, not a project going wrong.

07 The complete tech pack checklist

Work top to bottom. When every box is honestly ticked, your pack is factory-ready.

01. Style summary complete

Brand, style number, season, base size, target fabric, and contact all on the cover.


02. Flats from every view

Front, back, and interior/hood. Solid lines for seams, dashed for stitches.


03. Style summary complete

Each construction detail points at the flat and reads as an instruction.


04. BOM lists every component

Fabric, rib, lining, trims, thread, labels, hangtag—nothing assumed.


05. Fabric fully specified

GSM, composition, and finish are stated for the body and rib separately.


06. Measurement spec graded

Every POM listed against a base size and graded across the full range.


07. Tolerance set per measurement

Tighter on silhouette measurements, looser where it doesn’t matter.


08. Construction named

Seam, machine, stitch type, and SPI for each key operation.


09. Trims & hardware called out

Finish, size, and placement for every non-fabric part.


10. Colorways with pantone refs

One system (TCX), one reference per color, per colorway.


11. Labels & packaging documented

Fibre content, care, origin, hangtag, polybag, and packout.


12. One unit throughout

Centimeters or inches declared in the header, never mixed.


13. Swatches referenced

Physical fabric and trim references wherever a description could drift.


14. Version and date on every page

So the factory is always working from the latest pack.


15. Revision log started

Every change is recorded, so updates don’t create mixed instructions.


16. Sent as PDF + editable file

PDF to read and spreadsheet so the spec can be updated during fittings.


That is the whole job. Every one of these maps to a tab in the template below, so you are never starting from a blank page.

08 5 mistakes that get your quote padded

These are the gaps a factory sees most often and prices for.

1. Leaving the factory to “fill in the gaps”

Every blank in a tech pack is a decision the factory has to make without you. Sometimes they ask; often they just choose, and you find out at the sample. The fix is not perfection; it is honesty about what you have not decided yet, flagged clearly so it gets a conversation instead of a guess.

2. A measurement chart with no tolerances

A spec without tolerances has no pass/fail line, which means every sample is debatable. Set the band on each measurement, and the sample review becomes objective: it is in tolerance or it is not.

3. Vague fabric

“Heavyweight cotton” invites a substitution. Weight, composition, and finish — plus a swatch — give the mill something exact to match and the factory something firm to quote.

4. Colour described in words

“Off-black” is a different color in every dye house. A Pantone number is the same everywhere. Words are for the design board; Pantone is for the tech pack.

5. No version control

You email an update, the factory keeps cutting from last week’s pack, and now you have two garments. A version number and a revision log on every page stop that cold. Always send the latest pack as one file, dated.

THE PATTERN BEHIND ALL FIVE

Every padded quote traces back to the same thing: the factory found a question your tech pack did not answer. Close the questions, and the price comes down to the real cost of making your garment, which is exactly what you wanted to know.

The free tech pack template

A ready-to-fill spreadsheet built around the eight sections in this guide — pre-loaded with a worked hoodie example so you can see exactly what “complete” looks like.

Includes 10 tabs: Style Summary · Flats & Callouts · Bill of Materials · Measurement Spec · Construction · Trims & Hardware · Colorways · Labels & Packaging · Revision Log.

Fill it in, export to PDF, and send both files to your factory. If you want a second set of eyes before you do, our team reviews tech packs as part of onboarding a new style; that is what we do every day.

Frequently asked questions

Some will, but the number is a guess. Without a spec, the factory either pads the quote to cover the back-and-forth it expects, makes assumptions you never approved, or passes on the order. A complete tech pack gets you an accurate price and a much closer first sample.

Yes, arguably more than on a big one. The order size does not change how much information a factory needs to cut and sew the garment. And on a small run there is no volume to absorb the cost of a sample round gone wrong, so the tech pack is what protects your margin.

A spec sheet is mainly the measurement chart. A tech pack is the full package: flats, BOM, measurements, tolerances, construction, trims, colorways, and labels. A spec sheet can work with a factory that already knows your standards; a new factory needs the full tech pack.

Most everyday hoodies sit around 280–350 GSM. Premium and heavyweight streetwear usually runs 400 GSM and up. Lightweight layering pieces sit nearer 200–280 GSM. Always pair the GSM with a composition, since two fabrics at the same weight can feel completely different.

A good factory will help refine one, but handing over the whole tech pack hands over control of fit and finish. The better split is that you set the measurements, fabric, and standards, then let the factory advise on what is feasible and how to improve it.

You do not need specialist software to start. Many brands run their first tech packs in a spreadsheet plus flats drawn in Illustrator. A spreadsheet is easy to update during fittings, which is when most edits happen. Dedicated PLM and tech-pack tools are worth it once you are managing many styles a season. The free template here is built to get you to a factory-ready pack without buying anything.

If you build it yourself with a template, the only cost is your time. If you hire a technical designer, prices vary widely by garment complexity and region; a simple tee costs far less than a lined, multi-trim jacket. The more useful way to think about it: a tech pack is cheap next to the cost of a rejected sample run or a production order that comes back wrong. It usually pays for itself on the first style.

Vectors are the best flats drawn in Illustrator and exported as a PDF; they stay crisp at any size and are easy to annotate. Avoid low-resolution images a factory has to squint at. The artwork for prints and embroidery should also be supplied as a vector or a digitized stitch file, not a screenshot.

From the manual

This is one chapter of The Complete Streetwear Manufacturing Guide

These chapters cover taking a streetwear brand from idea to shipped units, costing, sourcing, tech packs, QC, freight, and launch. All written from the Sialkot factory floor.

Open The Full Guide