IN SHORT

The clothing sampling process moves through four stages: proto → fit → strike-off → pre-production (PP).

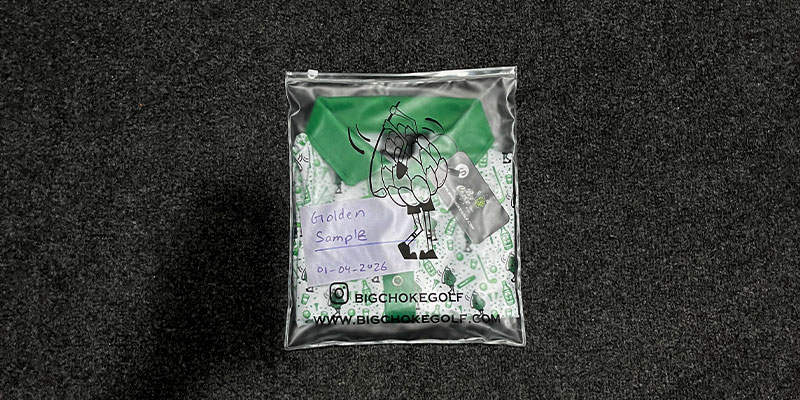
The golden sample is the signed, sealed reference your bulk is judged against; it’s your quality contract in fabric form.

Expect roughly 2–4 rounds before sign-off; each round costs both money and lead time.

Feedback works when it’s anchored to a spec line, a number, and a photo, not adjectives.

Rushing sampling is the single most common cause of bulk-quality failure.

What this guide covers


  1. What the sampling process really is

  2. The four stages, explained in order

  3. The golden sample, and why it protects you

  4. How many rounds to expect and the costs

  5. How to give feedback factories can act on

  6. Why rushing causes most bulk failures

  7. A realistic sampling timeline, week by week

  8. The sample sign-off checklist

  9. Appendix: sampling terms glossary

Chapter 1

What the sampling process really is

Sampling is the bridge between an idea on paper and a garment made by the thousand.

It is the stage where a factory builds your design a few units at a time, you check it, and you both fix problems while they are still cheap to fix.

tech pack tells the factory what you want.

A sample proves whether that intent survives contact with real fabric, real machines, and real hands.

The gap between the two is bigger than most new brands expect, and sampling exists to close it.

Think of it this way.

Your design has assumptions baked into it: a certain drape, a certain shrinkage, a print that sits exactly where you drew it, and a fit that flatters the body. Every one of those assumptions is a guess until a physical sample tests it. Sampling turns guesses into confirmed facts before you commit money to bulk.

Why the process exists at all

It would be faster to skip straight to production. It would also be a gamble with your entire order. Here is what sampling is actually protecting you from:

  • Fit surprises. A hood that looks right flat can sit wrong on a body. A sleeve that measures fine on paper can pull at the cuff.
  • Fabric behavior. Two fabrics with the same GSM on a spec sheet can drape, shrink, and feel completely different in hand.
  • Decoration drift. A print color on screen rarely matches the same color on fleece. Placement shifts. Embroidery puckers if the backing is wrong.
  • Construction reality. Some seams that look clean in a sketch are slow or weak to sew at scale, and a good factory will flag this during sampling.
From our sample room

We treat the first sample as a conversation, not a verdict. The point of a prototype is not to be perfect; it’s to surface every disagreement between what you pictured and what the garment actually wants to be, while changing it still costs one sample instead of a full run.

Sampling vs bulk: a different mindset

In bulk, you want everything locked and identical.

In sampling, you want to be ruthless about catching what is wrong.

These are opposite mindsets, and confusing them is where brands get into trouble.

The brand that wants its first sample to already be “the one” tends to under-comment, approve too early, and then meet the same flaws multiplied across a thousand units.

The healthier frame: every sample round is a cheap experiment. The cost of being thorough now is a few weeks and a few sample charges. The cost of being lazy now is a bulk run you can’t sell. We unpack that trade-off fully in Chapter 6.

What you need before sampling can start

Sampling goes faster and cheaper when you arrive prepared. Before a factory can make a useful first sample, it needs a clear picture of what you’re after. Three things do most of the work:

  • A tech pack. The more complete it is with measurements, fabric, GSM, construction notes, trims, and decoration placement, the closer your proto starts to right, and the fewer rounds you’ll burn.
  • Reference samples. An existing garment whose fit, weight, or hand you like gives the factory a physical target. One reference sample can save a whole round of explaining in words.
  • Target quantities. A rough order size lets the factory advise on fabric sourcing and whether the plan is viable against its minimums before you’ve sunk time into samples.

You don’t need every detail perfect on day one that’s partly what sampling is for. But the gaps you leave become questions the factory has to ask mid-round, and every question is a small delay. A strong starting brief is the cheapest speed-up available.

New to custom production?

If you’re moving from decorated stock blanks to fully custom cut-and-sew, sampling is the biggest new step in your workflow. Our guide on blanks vs. custom cut-and-sew covers when that jump is worth it.

Chapter 2 · The Sample Ladder

The four stages, explained in order

Every well-run sampling process climbs the same ladder. Each rung answers one question, and you don’t move up until that question is settled. We call it the Sample Ladder: prototype, fit, strike-off, pre-production, and then the sealed golden sample at the top.

The order matters. You confirm the concept before you chase fit. You confirm fit before you commit to bulk fabric and decoration. You prove everything together before you make the final reference. Skipping a rung doesn’t save time; it just moves the problem to bulk, where it’s expensive.

01

Proto sample

Question: Is this the right product?

The proto (also called the prototype, development, or first sample) is built straight from your tech pack to prove the concept. It often uses available or substitute fabric and stand-in trims because the goal is silhouette, proportion, and construction logic, not final materials.

You’re checking: does the design read correctly in three dimensions? Are the panels, pockets, hood shape, and overall look right? Proto rounds repeat until the concept is locked.

02

Fit sample

Question: Does it fit the body correctly?

The fit sample is sewn to your exact measurements, the points of measure (POM) in your spec, and reviewed on a fit model or dress form. Each measurement is checked against the spec and compared to how the garment actually sits and moves.

Fit comments come back as numbers (“raise the front pocket 1.5 cm,” “reduce cuff opening 1 cm”), and the sample is revised. Once the base size is approved, the other sizes are graded from it.

03

Strike-off & lab dips

Question: Are the color and decoration right on the real fabric?

lab dip is a swatch of your actual fabric dyed to match a target color (usually a Pantone TCX reference), approved before bulk dyeing. A strike-off is a test of your print or all-over pattern on the real substrate; for embroidery, it’s a sew-out.

This rung confirms color match, print placement, hand feel, registration, and that decoration survives the fabric. It often runs in parallel with fit so the timeline stays tight.

04

Pre-production (PP) sample

Question: Will the bulk look exactly like this?

The PP sample is the dress rehearsal. It’s made in the actual bulk fabric, actual trims, actual color, and actual decoration, ideally by the same line that will run production. Nothing is a stand-in anymore.

This is the sample you sign off against. When it’s approved, it gets sealed and becomes your golden sample. Many factories also pull a size set (one of each size) here to confirm grading across the run.

The golden sample (sealed)

The top of the ladder your reference standard

The approved PP sample, signed, dated, and sealed. It is the physical benchmark every production unit is measured against. We give it its own chapter next, because it’s the single sample that protects your whole order.

Upload Image...

A few stages you may also meet

Depending on the order, you may also see:

  • Size-set sample: one unit per size to verify grading is consistent across the full size run.
  • TOP sample (Top of Production): a unit pulled from the live bulk run to confirm it matches the golden sample.
  • Shipment/inspection sample used during final quality inspection before goods leave the factory.

These aren’t extra hurdles; they’re checkpoints that confirm bulk is staying true to what you approved.

Chapter 3

The golden sample, and why it protects you

The golden sample, also called the sealed sample, reference sample, or counter sample, is the approved garment that defines exactly what your bulk order should be.

It’s signed, dated, sealed, and held by both sides. If a dispute ever arises about quality, this is what settles it.

Everything before this point has been about getting things right. The golden sample is about recording that you got it right, in a form nobody can argue with.

It’s the difference between “We agreed it should look good” and “Here is the physical object bulk that must match.”

What makes a sample “golden”

A golden sample isn’t just a nice sample. It’s a sample that has been

  • Made in true bulk conditions: real fabric, real trims, real decoration, real production method.
  • Approved across every dimension: measurements, fit, fabric, color, print, trims, and construction all signed off.
  • Sealed and signed tagged with the style number, date, and signatures from both the brand and the factory.
  • Duplicated: usually the brand keeps one, and the factory keeps a matching counter sample, so both work from the identical reference.
Why “golden”?

Because it’s the one sample you don’t experiment on. Once it’s sealed, it doesn’t change. It becomes the fixed point that the entire production run and every quality check is calibrated to.

How it protects you in practice

The golden sample does quiet, important work all the way through production:

It’s the benchmark for quality control

When inspectors check production, whether in-line during sewing or at final inspection, they compare units against the golden sample, not against memory or a sketch. Stitch density, color, measurements, and trims: all judged against the sealed reference. This is the backbone of a real AQL inspection process.

It removes “he said, she said.”

If bulk arrives and something looks off, you don’t argue about intentions. You hold the delivered garment next to the golden sample. The reference is physical and signed, so the conversation is about facts, not opinions. That protects the relationship as much as the order.

It survives staff and time

People change. Memories fade. Email threads get buried. The sealed sample stays exactly as approved, so a reorder six months later still has a true reference even if different people run it.

From our sample room

We seal two identical golden samples and photograph both with the seal tag visible. The brand holds one; we hold the counter-sample, and the photos go in the order file. It sounds bureaucratic. It’s the cheapest insurance in the whole process.

One honest caveat: a golden sample only protects you if it genuinely represents bulk conditions. Sealing a beautiful handmade sample that the line can’t actually reproduce at speed sets a standard bulk will miss. That’s why it must come from the PP stage, made the way bulk will really be made.

Chapter 4

How many rounds to expect and what each costs

There is no fixed number of sample rounds. A simple garment with a clear tech pack might sign off in two rounds. A complex piece with unusual construction, tricky color matching, and heavy decoration can take four or more. What matters is understanding what drives the count, and that every round costs both money and time.

A realistic round count

For a typical custom hoodie or streetwear piece, here’s a grounded expectation:

Stage Typical rounds What you’re paying for
Proto 1–3 est. Pattern making, cutting, sewing one-off substitute materials
Fit 1–3 est. Re-sewing to revised measurements each round
Lab dip / strike-off 1–2 per color/print est. Dyeing swatches, test prints, embroidery sew-outs
PP sample 1 (sometimes 2) est. Full bulk-condition sample on the real materials

Add it up, and most orders land somewhere around 2–4 sampling rounds total before sign-off since fit and decoration often overlap

What actually costs money

Sampling costs come in a few buckets. Knowing them up front stops the bill from feeling like a surprise:

  • Sample charges. A per-sample fee covering pattern, cutting, and sewing a one-off. One-off production is inherently more expensive per unit than bulk; you’re paying for setup without the scale.
  • Lab dip & strike-off charges. Each color match and each print test carries a small cost, repeated per round if approval isn’t first-time.
  • Courier/freight. Often the hidden cost. Every round usually means an international shipment each way, and express freight per round adds up fast.
  • Time. Not a line item, but the most expensive cost of all. Each round is made of time plus shipping plus your review time, typically a week or more per loop.
Upload Image...

Sample charges are often credited. Many factories, including us, credit some or all sampling charges against the bulk order once it’s confirmed, so the cost effectively folds into production. Always ask how a factory handles this before you start. Bulk pricing itself is a separate topic we break down in our cost breakdown guide.

How to keep the round count (and cost) down

The biggest lever is the tech pack. The clearer your starting brief, the fewer rounds you’ll burn discovering things that could have been specified on day one. After that:

  • Send reference samples of an existing garment whose fit or fabric you like so the prototype starts closer to right.
  • Consolidate every comment into one feedback sheet per round instead of trickling notes (more on this in the next chapter).
  • Approve colors against physical Pantone references, not screenshots.
  • Don’t chase perfection on the prototype; substitute fabric. Lock the concept, then move up the ladder.

Minimums interact with this too: sampling is also where you confirm the order is viable against the factory’s MOQ before committing.

Chapter 5 · The Three-Anchor Feedback Method

How to give feedback factories can act on

Most wasted sample rounds come from vague feedback, not bad factories. “The fit is a bit off” or “make the color pop more” can’t be sewn. A factory can only act on instructions that are specific, measurable, and located. The fix is a simple habit we call the Three-Anchor Feedback Method: anchor every comment to a spec line, a number, and a photo.

Anchor 1

A spec line

Tie the comment to a point of measure or a tech pack reference so the factory knows exactly which element you mean: “front pocket opening (POM 14),” not “the pocket.”

Anchor 2

A number

Replace adjectives with measurements. “Lengthen sleeve 2 cm at the cuff” or “match Pantone 19-4006 ‘TCX’,” never “a little longer” or “darker.”


Anchor 3

A photo

Mark the sample physically, pin, tape, or chalk the spot, photograph it, and attach the image to the comment. A marked photo erases ambiguity instantly.

When a comment carries all three anchors, there’s nothing left to interpret. The sewing team reads the spec line, applies the number, and confirms against the photo. That’s how you collapse three muddy rounds into one clean one.

Write comments the way the factory reads them

A few habits make feedback land:

  • Use the correct terminology. Call it a kangaroo pocket, a rib cuff, a set-in sleeve, or a flatlock seam. Right words remove guesswork. (Our hoodie anatomy guide is a handy reference.)
  • Approve what’s right, explicitly. Don’t only flag problems. Saying “fit through the body is approved; keep as is” stops a factory from accidentally changing something that was already correct.
  • One consolidated sheet per round. Number every comment. Don’t send three emails over two days; the factory may already be cutting before your fourth note lands.
  • Separate “must change” from “nice to have.” Mark priority so the critical fixes never get lost behind cosmetic preferences.
  • Keep a revision log. Track each comment across rounds so you can see what was fixed, what’s outstanding, and what was approved and so nothing silently reappears.

From our sample room

The single most useful thing a brand sends us is a marked-up photo with a measurement written next to the mark. It removes an entire layer of back-and-forth. The brands that sign off fastest aren’t the ones with the simplest garments; they’re the ones whose comments we never have to ask twice about.

Feedback habits that quietly cost you rounds

A few patterns waste rounds without anyone noticing they’re the cause:

  • Drip-feeding comments. Sending notes one at a time across several days means the factory may start acting on the first batch before the rest arrives. Always consolidate.
  • Changing your mind between rounds. Reversing an approval you gave last round resets work and erodes trust in your sign-offs. Decide, then commit.
  • Judging color on a screen. Monitors lie. Approve color against a physical Pantone chip in consistent lighting, never a photo or a screenshot.
  • Only listing problems. If you never say what’s right, a factory can accidentally “improve” something that was already correct. Approvals matter as much as corrections.
  • Skipping the measurement. “A bit,” “slightly,” “more”—these aren’t actionable. If you can’t put a number on it, mark it on the sample and photograph it instead.

A quick before-and-after

Vague (causes a wasted round) Anchored (acts on it immediately)
“Sleeves feel a bit long.” “Sleeve length (POM 8): reduce 2 cm from cuff. See photo 3, marked.”
“The hood looks small.” “Hood height (POM 22): increase 1.5 cm. Compare to the reference sample sent.”
“Make the print color richer.” “Print color: match Pantone 18-1664 TCX. Current strike-off reads too pink.”
“The fabric feels thin.” “Confirm bulk fabric is 380 GSM brushed-back fleece per tech pack, not 320.”

Chapter 6

Why rushing sampling causes most bulk-quality failures

If there’s one idea to take from this guide, it’s this: sampling is the cheapest place in the entire process to fix a mistake. Skip it, compress it, or sign off early, and the mistake doesn’t disappear; it multiplies across every unit in your bulk run, where fixing it costs the most.

Almost every serious bulk-quality failure can be traced back to a sampling step that was skipped or hurried. Here’s how rushing actually goes wrong.

The classic shortcuts and what they cost

Approving a proto in substitute fabric and going straight to bulk

The proto looked great, so why wait for a PP sample in the real fabric? Because the substitute fabric lied to you. Real bulk fleece can shrink differently, drape differently, and feel different in hand. You find out after a thousand units are cut.

Skipping the wash test

Fabric that isn’t wash-tested can shrink, twist, or bleed color after the customer’s first laundry cycle. A sample wash takes a day. A bulk run that shrinks two sizes is unsellable.

Compressing fit rounds

“Close enough, let’s run it.” A fit that’s 1.5 cm off on one sample is 1.5 cm off on every single unit. Small, tolerable-looking errors become consistent, returnable flaws at scale.

Not sealing a golden sample

Without a sealed reference, there’s no agreed standard. When bulk arrives and something’s off, there’s nothing objective to measure against, just two parties remembering the approval differently.

The math of a mistake. Fixing a flaw on one sample costs one sample. Fixing the same flaw after bulk means rework, replacement, or scrap across the whole order plus a blown delivery date and a customer who’s already waiting. The few weeks sampling “costs” are almost always cheaper than the alternative.

A real example

A brand once asked us to skip the wash test to save a week before a drop. We pushed back and ran it anyway. The fleece shrank more than expected and twisted at the side seam, a problem we fixed by adjusting the fabric finish and pattern before bulk. Had we shipped on the original plan, the whole run would have shrunk a half-size in the customer’s first wash. One day of testing saved the entire order.

Where real schedule pressure should go

Deadlines are real, and sometimes you genuinely need speed. The answer isn’t to skip rungs; it’s to parallelize them. Run lab dips and strike-offs alongside fit instead of after it. Lock a clean tech pack so the prototype starts closer to right. Pre-book bulk fabric so it’s ready the moment the PP sample is approved.

Compress the calendar by overlapping stages and tightening feedback. Don’t compress it by deleting the checks that protect your order. We map the realistic version of that calendar next.

Upload Image...

Chapter 7

A realistic sampling timeline, week by week

Sampling rarely runs on a perfectly fixed schedule, but it follows a predictable shape. Here’s a grounded week-by-week view for a custom hoodie, assuming a clean tech pack and reasonably prompt feedback. Treat it as a planning baseline, not a promise; your real timeline shifts with complexity, round count, and shipping distance.


Week 0

Tech pack finalised

Design, measurements, materials, and decoration locked. Reference samples sent. The cleaner this is, the shorter everything after it.


Weeks 1-2

Proto sample made & reviewed

First sample built from the tech pack and shipped. You review concept, proportion, and construction. Comments returned.


Weeks 2-4

Fit rounds

The sample was re-sewn to corrected measurements and re-reviewed. One to three loops depending on how close round one landed.


Weeks 3-4

Lab dips & strike-offs (runs in parallel)

Color matching and print/embroidery tests approved on the real fabric overlapped with fit to save calendar time.


Weeks 5-6

PP sample made & reviewed

Full bulk-condition sample on the real materials. Final checks across fit, fabric, color, decoration, and construction.


Weeks 6+

Sign-off & golden sample sealed

PP approved, sealed, signed, dated, and duplicated. Bulk production begins against the sealed reference.

So a typical sampling phase runs roughly three to six weeks before bulk starts longer with extra rounds or long shipping legs. The single biggest variable isn’t the factory’s speed; it’s how fast and how clearly feedback comes back. A round can sit idle for a week waiting on comments, then move in days once they arrive.

Plan sampling into your launch date, not around it. Brands that set a drop date first and discover sampling second are the ones who end up rushing. Count back from your launch: bulk production time, then the full sampling phase, then tech-pack prep. That’s your real start date.

Chapter 8 · The Detailed Checklist

The sample sign-off checklist

Before you approve a PP sample and seal it as your golden sample, every item below should be a confirmed yes. This is the final gate between sampling and bulk the moment to be thorough, not hopeful. Print it, work through it, and don’t sign until each box is genuinely checked.

Before you seal the golden sample


Measurements. Every point of measure matches the approved spec within tolerance.


Fit. Confirmed on a fit model or form that sits and moves correctly, base size locked.


Fabric. Correct composition, GSM, hand feel, and finish are the real bulk fabric, not a substitute.


Color. Lab dip approved against the physical Pantone reference in correct lighting.


Decoration. Print, all-over pattern, or embroidery strike-off approved for color, placement, and hand.


Decoration. Print, all-over pattern, or embroidery strike-off approved for color, placement, and hand.


Trims & labels. Drawcords, zips, eyelets, woven labels, and hangtags are all correct and final.


Wash test. Shrinkage, twisting, and colorfastness were checked after washing.


Construction. Seam types, stitch density, and finish match the spec and survive at production speed.


Grading. The size set was reviewed so the fit holds across the full size run.


Seal & sign. A golden sample tagged with style number and date, signed by both sides, and a counter sample retained.


Work through this list, and the handoff to bulk becomes calm and boring which is exactly what you want. Every “yes” here is a problem that can’t surface later. The sealed golden sample then carries that approval all the way through production and into final quality inspection.

From our sample room

When a brand and our team walk this checklist together on a video call, holding the PP sample to camera item by item, sign-off becomes genuinely final. Nothing gets “assumed approved.” That ten-minute walkthrough is the best protection against a bulk surprise we know of.

Appendix

Sampling terms glossary

Factories move fast and use shorthand. Here’s a plain-English reference for the terms you’ll hear across the sampling process, so nothing in an email or a call catches you off guard.

Term What it means
Tech pack The full specification document for your garment measurements, materials, construction, trims, and decoration. The starting point for the whole process.
Proto sample The first sample, built to prove the concept. Often made in substitute fabric and trims. Also called a development or first sample.
Fit sample A sample sewn to your exact measurements and reviewed on a body or form to confirm fit before bulk.
POM (Points of Measure) The specific measurements that define a garment are chest width, sleeve length, hood height, and so on. Feedback should reference these.
Grading Scaling an approved base size up and down to create the full-size run (S, M, L, XL…) in correct proportion.
Lab dip A swatch of your actual fabric dyed to match a target color, approved before bulk dyeing.
Strike-off A test print of your artwork or pattern on the real fabric to approve color, placement, and hand before bulk printing.
Sew-out The embroidery equivalent of a strike-off is a test stitch of your embroidered design to approve before bulk.
Pantone TCX A standard textile color reference system. Specifying a Pantone TCX code removes guesswork from color matching.
PP sample (Pre-Production) A sample made in the real bulk fabric, trims, color, and decoration is the final dress rehearsal you sign off against.
Size-set sample One unit of each size is made to confirm grading holds correctly across the full size run.
TOP sample (Top of Production) A unit pulled from the live bulk run to confirm production is matching the golden sample.
Golden/sealed sample The approved, signed, sealed reference garment that bulk is measured against. Your quality standard in physical form.
Counter sample The matching copy of the golden sample the factory keeps so both sides work from an identical reference.
Tolerance The allowed margin of variation on a measurement, e.g., ±1 cm, within which a garment still passes.
GSM Grams per square meter: the weight of a fabric. Higher GSM generally means heavier, denser fleece.
Wash test Washing a sample to check shrinkage, twisting, and colorfastness before committing to bulk.
Bulk fabric The actual fabric that will be used for the production run distinct from any substitute used in early sampling.
Trims The non-fabric components: drawcords, zips, eyelets, woven labels, and hangtags that also need approving during sampling.

Keep this list handy through your first few sampling cycles. Once the vocabulary is second nature, the whole process moves faster you’ll spend your energy on decisions instead of translation.

Frequently asked questions

It’s the stage where a factory builds your design a few units at a time so you can check and correct it before committing to a full production run. It moves through four stages prototype, fit, strike-off, and pre-production, ending in a signed, sealed “golden sample” that bulk is measured against.

Most custom hoodie orders sign off in roughly two to four rounds total, since fit and decoration testing often overlap. A simple garment with a clear tech pack can be faster; a complex piece with tricky color or construction can take more. The clearer your starting tech pack, the fewer rounds you’ll need.

The golden sample is the approved, signed, and sealed reference garment that defines exactly what your bulk order should be. Quality inspectors compare every production unit against it. Because it’s physical and signed by both sides, it settles any dispute about whether bulk matches what was approved; it’s your quality standard in fabric form.

Yes sampling carries real costs: sample charges, lab dip and strike-off fees, and courier or freight for each round. Many factories, including us, credit some or all of those charges against the bulk order once it’s confirmed, so the cost effectively folds into production. Always confirm a factory’s policy before you start.

A prototype proves the concept and is often made in substitute fabric. A fit sample is sewn to your exact measurements to confirm fit. A pre-production (PP) sample is made in the real bulk fabric, trims, color, and decoration; it’s the final dress rehearsal you sign off against before it becomes your golden sample.

Anchor every comment to three things: a spec line (which is a point of measure), a number (an exact measurement or Pantone code), and a photo (the sample physically marked). Replace adjectives like “a bit long” with “reduce 2 cm at the cuff,” consolidate all notes into one sheet per round, and explicitly approve what’s already correct.

For a custom hoodie, the sampling phase typically runs about three to six weeks before bulk production begins, depending on round count, garment complexity, and shipping distance. The biggest variable is feedback speed: a round can stall for a week waiting on comments, then move in days once they arrive. Plan sampling into your launch date by counting backward from it.

Sampling is the cheapest place to catch a mistake. A flaw fixed on one sample costs one sample; the same flaw discovered after bulk means rework, replacement, or scrap across the entire order. Most serious bulk-quality failures trace back to a skipped wash test, a compressed-fit round, or going straight to bulk from a substitute-fabric proto.